Plot Editing Guide
Overview
Discover the power of personalisation as you learn how to transform your purchased land into a masterpiece. From altering the terrain and styles of buildings, to adding unique features to your cityscape, the possibilities are endless.
Whether you just want to create your own pretty place in Infiniverse, or whether you have aspirations of founding a new community – this guide will help you navigate the Map Room and all the Plot Editing options.
We recommend that you read it through fully before starting, as it contains lots of useful information and warnings about pitfalls to avoid.
Why purchase a plot?
There are many reasons why you might want to purchase a plot in Infiniverse. Apart from the fact you can customise it with your own choice of statues and style, you will also earn commission on apartment sales, storefront registrations and purchases from Utility Kiosks.
You might also wish to preserve a particular view or landscape from a neighbouring plot - and if you do buy adjacent plots, then you get a discount!
Finally, you get the ability to place Hubscrapers and earn your very own listing on the Discovery Menu as well as a City Door in the Infinihub.
Some key terms before we begin
Plot: Also known as a District, this is an entire parcel of land within Infiniverse. If developed, it will be surrounded by a wide main road and divided into multiple Blocks.
Block: Also known as a subdistrict, this is each of the grid-like tiles within a Plot. Each Plot typically has around 30 Blocks.
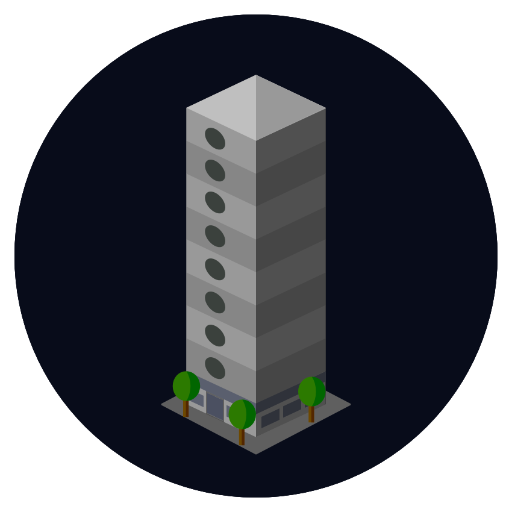
Building: These are individual buildings on a Block. Each block typically contains 1-8 buildings, depending on the density of the area and building type.
Building Skin: These are the different styles of building available to editors. There are four skins – Central, Empire, Village, and Cyber:

Central Style

Village Style

Empire Style

Cyber Style
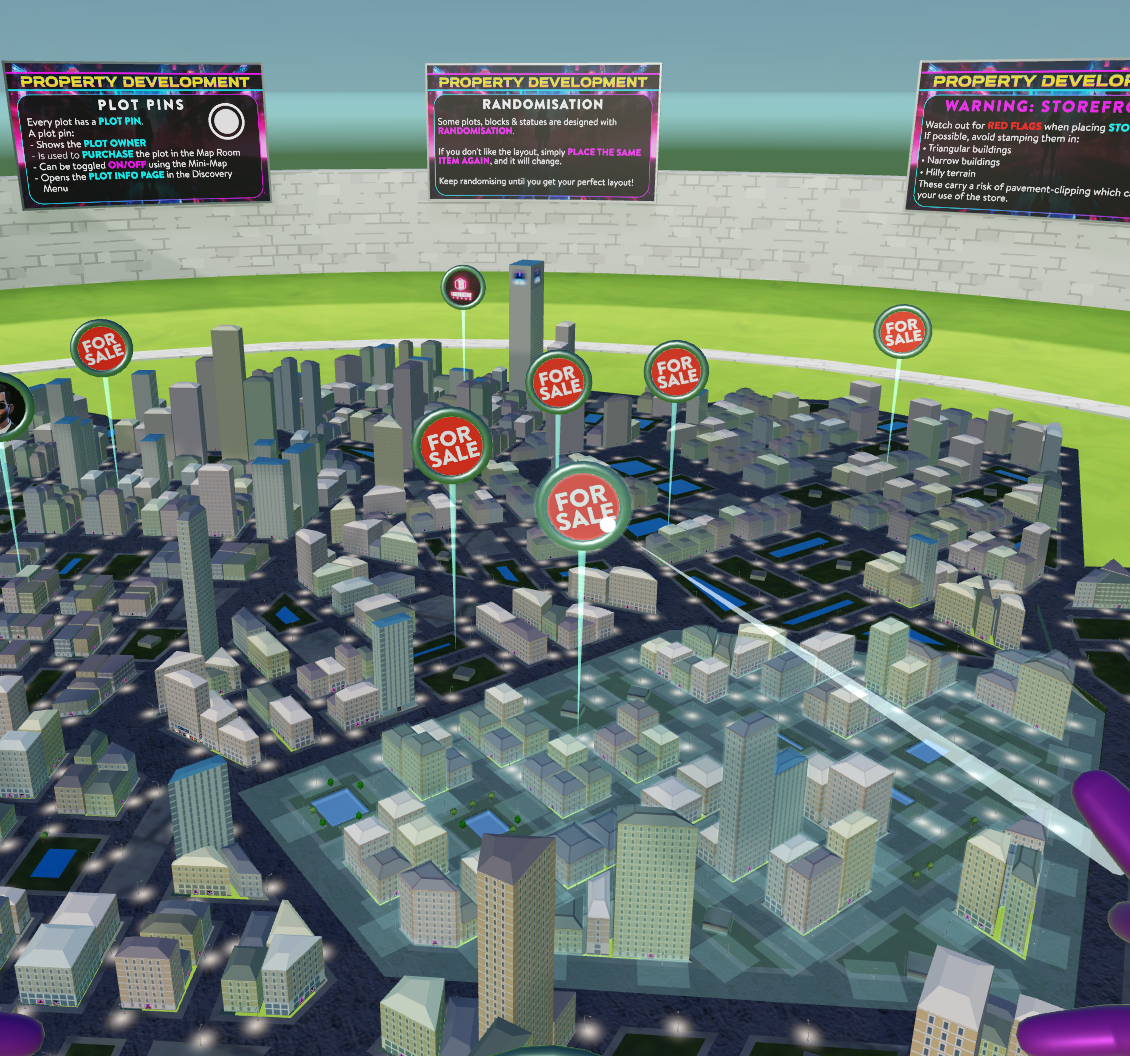
Stamping: You edit your plots and blocks by “stamping” your chosen features, e.g. terrain, buildings or statues.
Randomisation: Every time you stamp a feature, the layout or statue gets randomised. If you are unhappy with the first result, simply stamp again for another variation.
City: This is the only plot option that includes skyscrapers, and is generally a more densely populated area with more and higher buildings.
Urban: An area containing a mix of buildings and open spaces, but varying in density and building height depending on the chosen option.
Suburban: Also known as “village”. A village plot has fewer blocks, and village buildings are larger and lower in height.
Buying Plots of Land In Infiniverse
Warning⚠️: Before selecting which plot you wish to purchase, note that if the plot has already been developed (has buildings or a unique statue on it), you may be restricted in what changes you can make.
For example, you won’t be able to change the building skin or delete buildings. In addition, certain plots are “Protected”. If you are unsure, please contact us at support@ftl.ltd for additional information.
Remember also that plots cannot currently be traded or returned to the market.
Points to consider when selecting a plot:
The terrain — is it hilly or flat? Some statues and buildings work better on flat ground, so think ahead to what you want to place there.
The surrounding plots — we cannot control whether other users purchase plots near yours, or what they place on them. If you want a plot to remain isolated, the only way to guarantee is to purchase the surrounding plots also. Likewise, buildings on a nearby plot that are currently low may grow in height and obscure views. If unsure, why not reach out to the owners of neighbouring plots, and discuss your plans.
How to purchase a plot
There are two ways to purchase a plot.
Option 1: In Infiniverse
Travel around Infiniverse until you find a plot of land you wish to purchase.
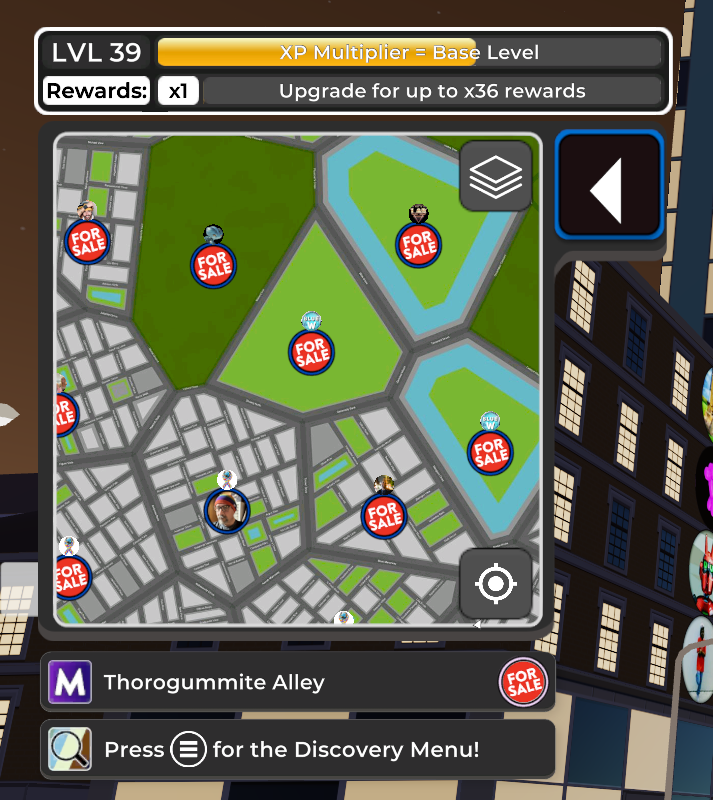
Open the Map from your wrist menu, to check whether the plot is for sale:
Click on the “For Sale” icon, which will open the Discovery Menu.
If you are happy with the purchase price, click the “Buy” button to complete the transaction.
Option 2: In the Map Room
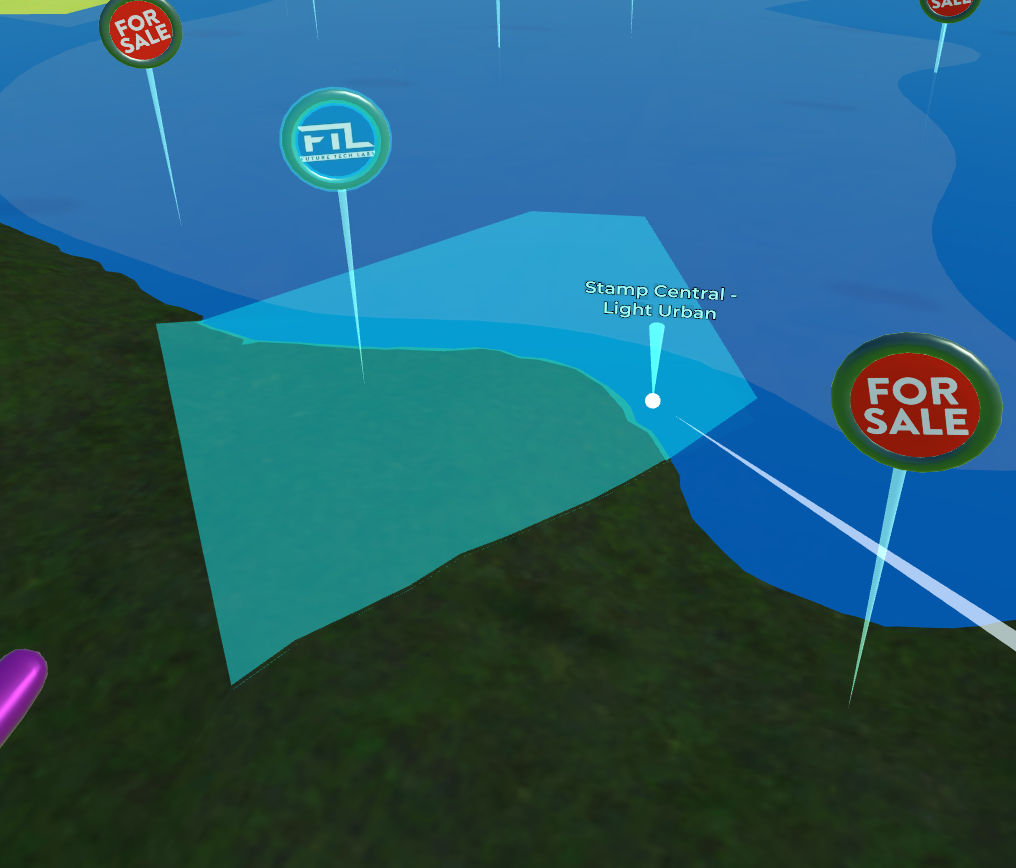
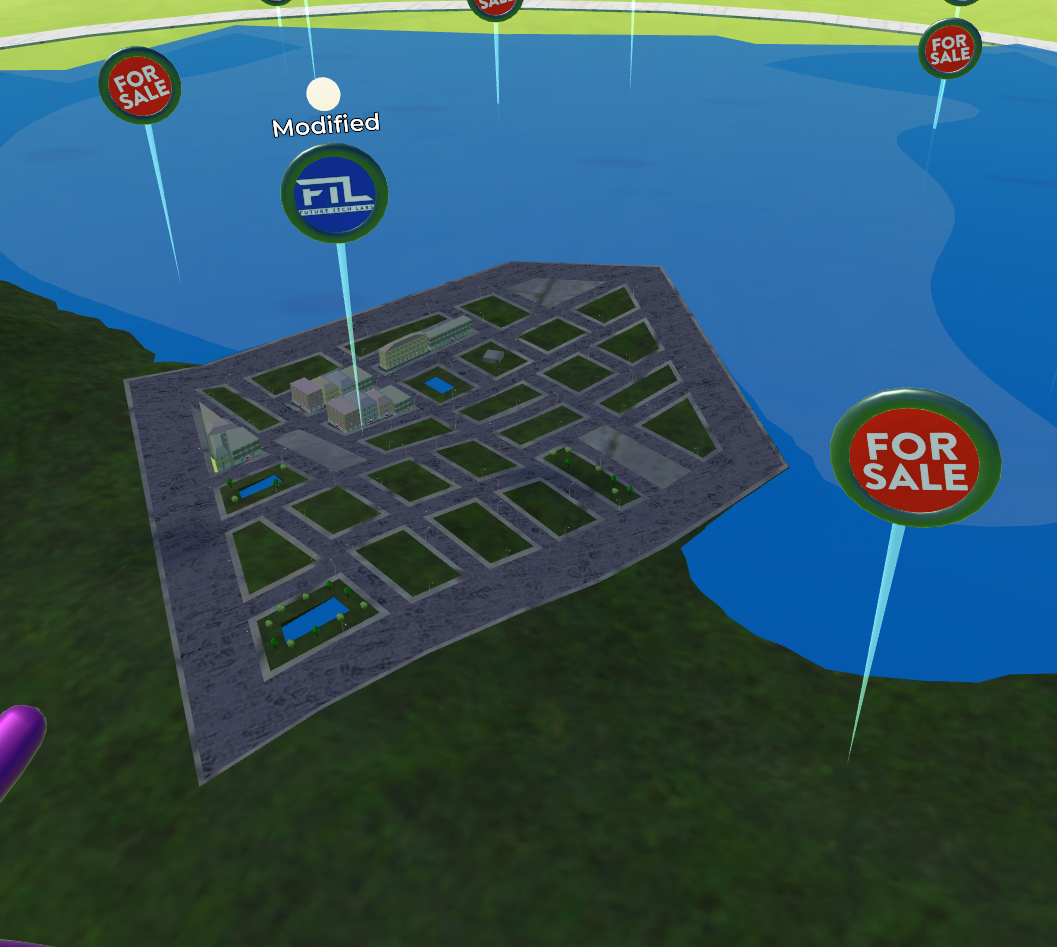
Find a plot you wish to purchase and make sure it is displayed in the central area of the room:
If you travel to the Map Room directly from Infiniverse, the Map will be centred on the plot that you came from.
You can also centre the map via the Discovery Menu, by clicking “Centre” on the page for any plot or landmark. NOTE: The “Locate” button will teleport you out of the map room, to the location in Infiniverse, so make sure you click the right button!
After making sure the plot is for sale, click the “For Sale” beacon above the plot:

Review the purchase price and other information, then click “Buy” to complete the transaction.
For a more in-depth tutorial about using the Map Room, visit our handy tutorial: Coming Soon!
Now that you have purchased your plot, you can begin editing it.
Jump to:
Plot Editing Options
Block Editing Options
Building Editing Options
FAQs
How to Edit your Plot:
An overview
Follow these simple steps to edit your plot of land
Step 1: Go to your Map Room
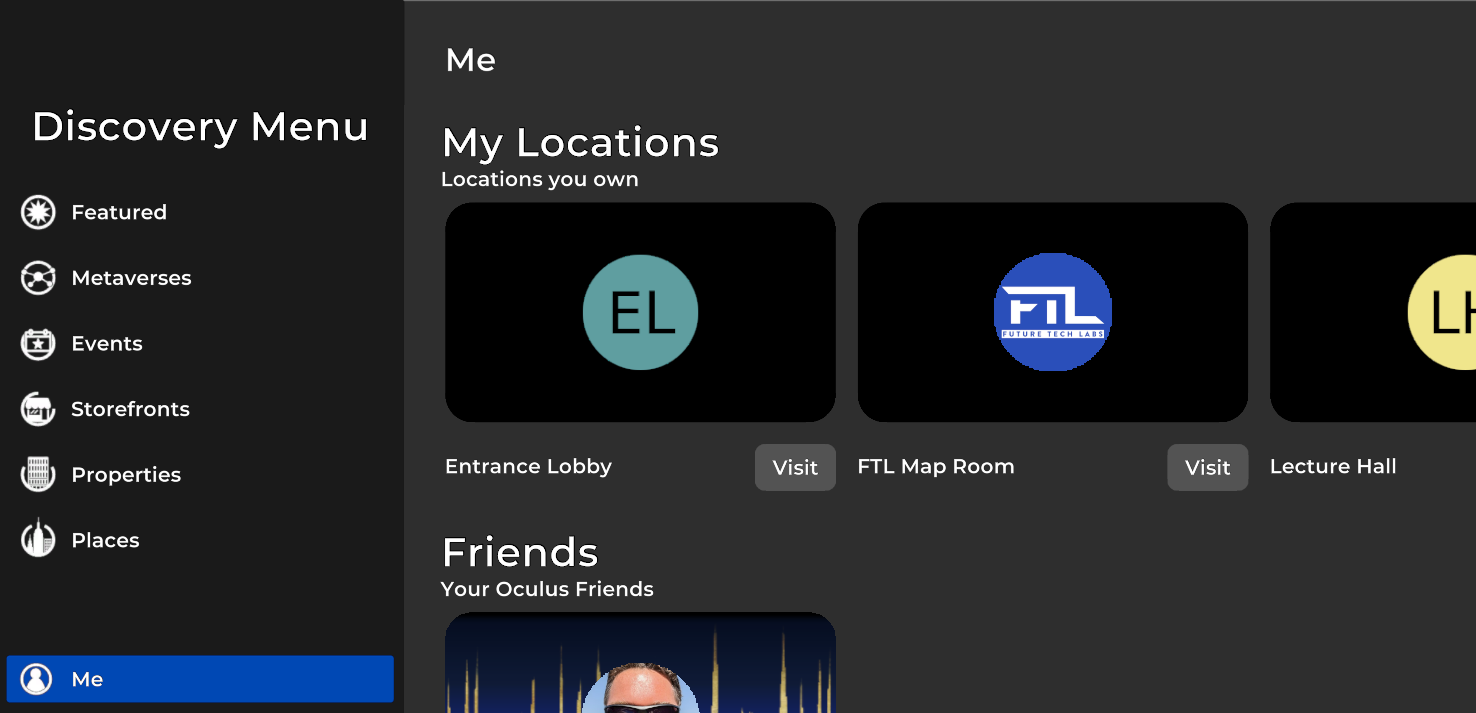
You can only edit plots you own, and only from the Map Room. Every user is automatically given a map room, which you can access via the Me > My Locations section of the Discovery Menu.
Step 2: Centre the map on your plot
Make sure your plot is displayed in the mini-map in front of you. If not, navigate to the plot via the Me > My Plots section of the Discovery Menu, select the plot and click “Centre”. This will centre your plot in the Map Room. Tip: Don’t click “Locate” as this will exit the Map Room and take you to your plot in Infiniverse!

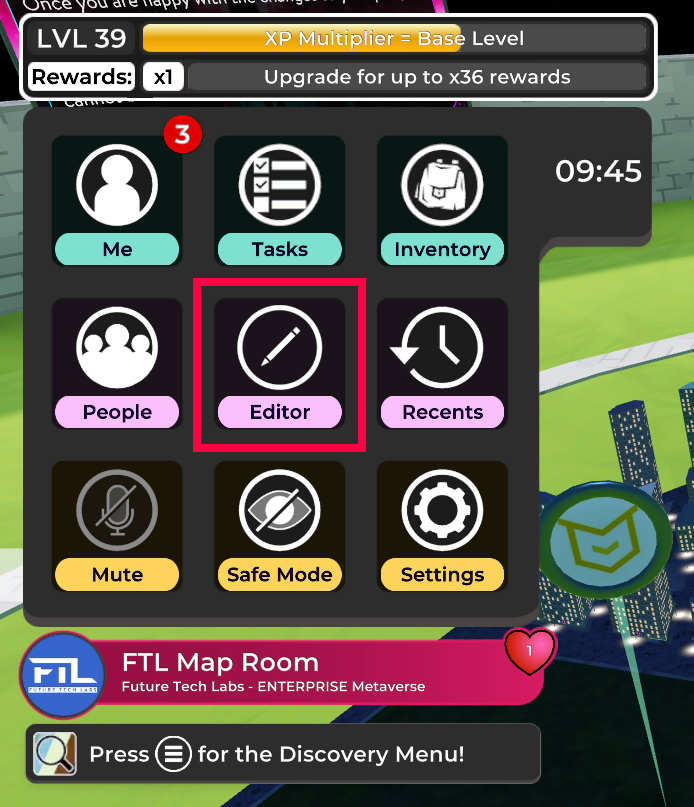
Step 3: Open the Editor Menu
Start editing your plot by opening the “Editor” section of the Wrist Menu. Note, this section is only available when you are in the Map Room. Depending on whether the plot is already developed (has buildings on it) or is virgin land, you can then edit it in various ways (see below).
Step 4: Navigate to your chosen edit
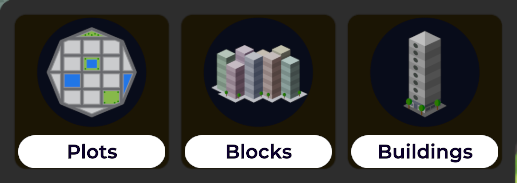
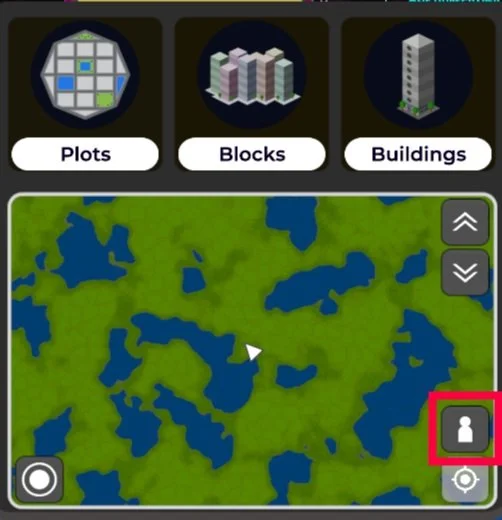
The Editor Menu gives you three different ways of editing your Plot:
Plots
Blocks
Buildings
These must be applied in order: you cannot stamp blocks without first choosing your plot type, and you cannot stamp a building add-on without first placing a building block!
Select the option you wish to use, which will open a list of all the available stamps, then scroll to whichever feature you wish to apply and click on it.
Step 5: Stamp the feature
Now point at the plot or block where you wish to place the stamp, then click the trigger to stamp it.
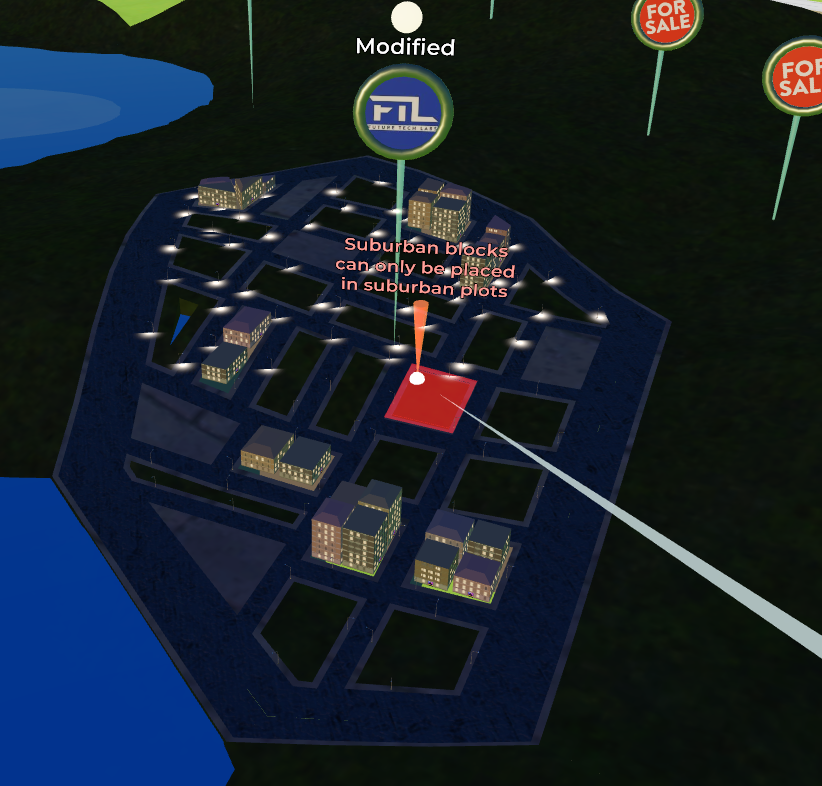
Note that some items are restricted, in which case you will get an error message that you cannot stamp there.
Step 6: Randomise!
Layouts and statues are randomised. If you are not happy with the first layout you get, simply stamp again, and it will randomise to a new layout or statue (depending on what you are editing).
Step 7: Review
Step back and review your changes. It is especially important at this stage to shrink to mini-me mode so you can view the plot from street level. This will give you a better view of how your plot will look once your changes are applied, and will review smaller items that are not visible from room-scale (e.g. flowers) or that look different in mini-me view (e.g. kiosks).
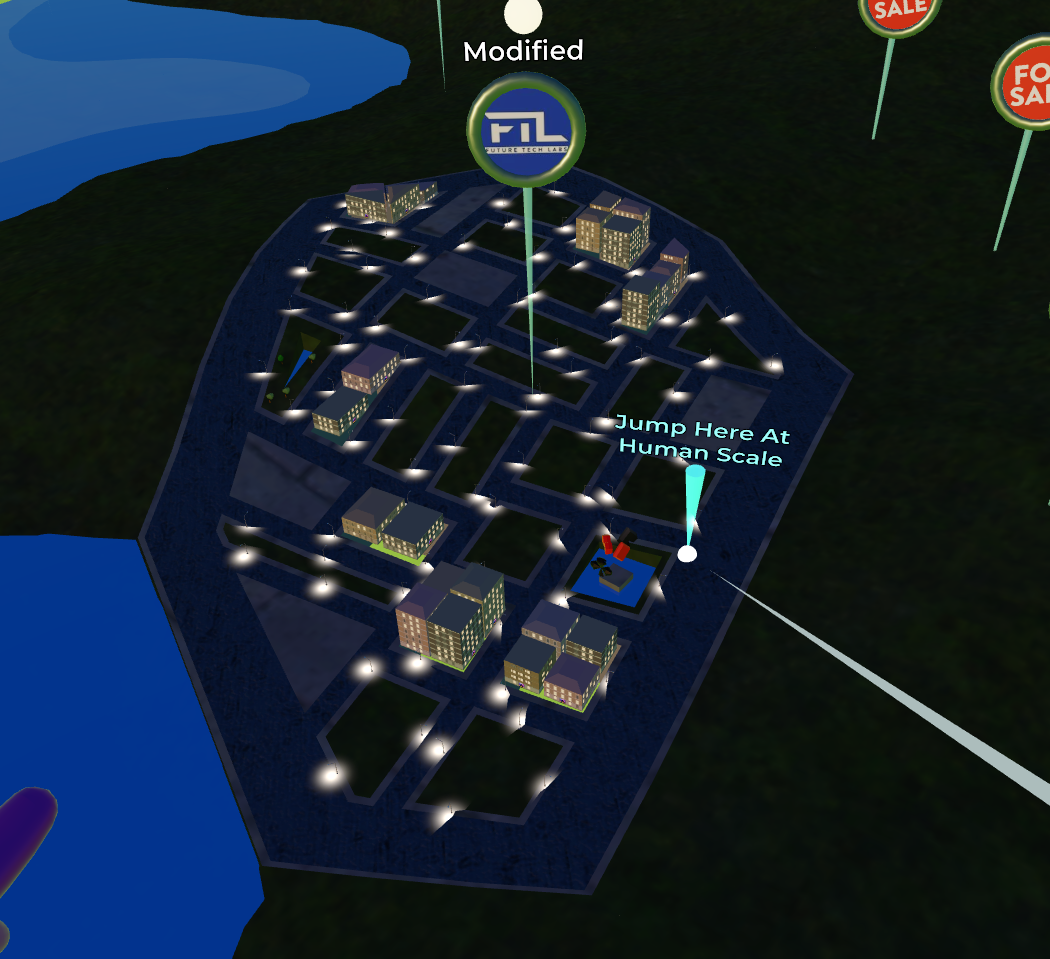
Step 8: Build or Reset
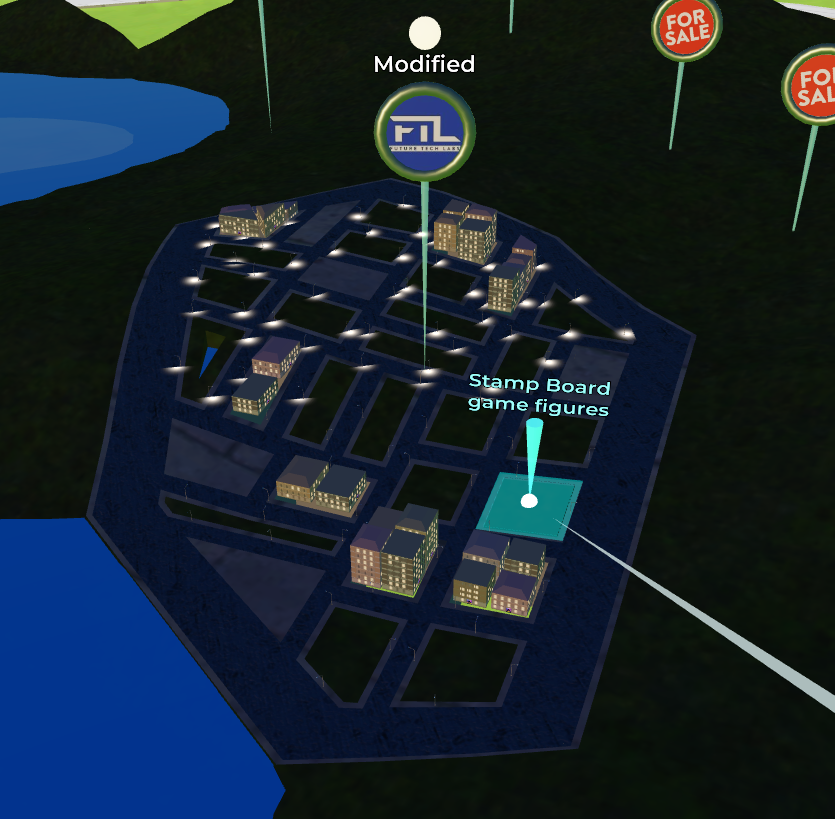
Once you are happy with your design, click the plot pin above your plot, which should say “Modified” to indicate that there are unapplied changes. This will open the Discovery Menu, displaying the total cost of your edits, listed by type.
You then have three options:
Option 1: “Reset” – revert all changes back to the last saved state.
Option 2: “Build” – apply all changes made. Remember, some of these changes will be permanent and cannot be built over.
Option 3: Come back later to continue editing.

⚠️Warning: Permanent Items
Some changes are permanent and cannot be changed once applied:
Plots with buildings on them
All types of buildings
Owner statues
Building skin styles
Storefronts
Utility Kiosks
Take extra care when stamping and applying these items.
Step 9: Congratulations!
You have successfully edited your plot and can enjoy the views in full by navigating there in Infiniverse.
Handy Tip:
The Me section of the Discovery Menu lists all your plots, including which ones have any unapplied changes, so you can jump to each one quickly and easily.
If you have purchased a plot that is already developed (has buildings or a landmark/drop), you will not be able to change the plot to a different type. Instead, skip down to Block Options or Building Options to view the next level of edits available.
However, if your plot is undeveloped (virgin land), you are free to pick which plot type you wish to stamp:
Editing your plot:
Plot-level options
Non-Residential Plots
Countryside – Returns your plot to its original undeveloped terrain
Park – A green park with a road around border
Lake – A lake with road around the border
Island – A lake with an island in the middle and a road around the border


Residential Plots
If you wish to convert your virgin land into a residential area, you can select both the density (number/size/height of buildings) and the building skin:
Building density
City – A denser conurbation with a mix of skyscrapers and apartment blocks, and fewer green/empty blocks
Urban (Light, Medium or Dense) – A mix of green/empty blocks and buildings.
Light: fewer buildings, starting height 2-3 storeys
Medium: more buildings, starting height 4-6 storeys
Dense: most buildings, starting height 7-10 storeys
Village (also known as Suburban) - Larger blocks with decorative trees, and few or no buildings with a starting height of 2-3 storeys.
⚠️Note: Your choice will determine what types of building you can later place there. For example, village houses can only be built on Village plots; and city buildings can only be built on City or Urban plots. Storefronts can be placed on all plot types.
Building Skin
Central, Empire or Cyber: These styles are available as Cities and Urban plots (light, medium or dense). Any buildings you stamp on these plots will have the same style.
Village: If you select this option, you will only be able to build Village-style houses on the plot.
⚠️ Note: Once stamped, the building skin cannot be changed to another style.
Note about Residential Plots
Once applied, even if there are no buildings or no residents in buildings, you cannot change a City, Urban or Village plot to a different type. Make sure you choose wisely, and don’t apply any changes until you are sure.
Note about Virgin vs. Developed Land
Some virgin plots are half land/water with a natural terraformed shoreline. When you stamp on these plots, you will lose the natural shoreline and it will be converted to “reclaimed” land with an artificial shoreline.
(Skip to Plot Options or Building Options to view other levels of edits available.)
Once you have decided on the layout of your plot, you can then start editing each of the individual blocks.
The options are all listed on a single menu, but can be divided roughly into the following categories:
Editing your plot:
Block-level options
Buildings
Add more buildings to your plot based on your desired density and style.
Here are the available building options:
City - The block will contain a mix of apartments and skyscrapers.
Urban (Light, Medium or Dense) - The block will contain a selection of apartments, varying in maximum height and density.
Village (suburban) - Each block will contain a low buildings with starting height of 2-3 storeys in the village skin. This option is only available for village plots
Hubscraper - this building occupies an entire block, and you may only place 1 per plot.

Statues
We have a huge range of statue sets to choose, and are adding more all the time:
Easter Cuties
European Icons
Oceania Icons
South American Icons
North American Icons
Party time
Maritime Island
Christmas Nativity
Pick-n-mix
Hot air balloons
Forest wildlife
Musical instruments
Savana wildlife
Christmas Merries
Christmas Jollies
Mini volcano
African Icons
Asian Icons
Remember: These are sets of statues, and each time you stamp, you will get a random item from within the stamp. Don’t like it? Stamp again to get a different one. For a full list of statues contained within each set, please contact us at support@ftl.ltd.
Jetpack Obstacles
Want to create a jetpack race course? We have a range of hoops, tunnels, markers and winner podiums in 2 colour schemes to choose from.
Handy Tip:
These obstacles are fairly large and can affect views from neighbouring plots. Be a considerate landowner and consult nearby plot owners or residents before building something that might affect their view.


Basic Terrain
Keeping it simple? Choose between simple asphalt, grass or a pond!


Greenery/Decoration
Some of our most popular “stamps” are trees, plants and simple decorations:
Fountains
Prickly pear cacti
Flowering shrub border
Meadow flower border
Sunflower border
Palm tree border
Extra large trees
Tulip border


Water reeds
Street furniture (ornamental, oriental, pride, rustic, standard, sci-fi styles)
Tree border
Pine forest
Pine trees
Autumn tree border
HANDY TIP: Some of these items are fairly small e.g. flowers, and will not be visible when standing at room-scale in the Map Room. You should therefore shrink down to mini size to view your changes up close before deciding whether to apply.


Owner Statues
If you want to advertise yourself as the owner of the plot, then place an Owner Statue! It will display your icon as the proud landlord or lady!
⚠️Warning: Owner Statues are permanent and cannot be stamped over with anything else.

Board game figures
Dinosaur
World Towers
Space travel
The third item on the Editor menu is called “Buildings”, although in fact this refers to add-ons to buildings rather than the buildings themselves. They can therefore only be used on an existing building.
Skip to Plot Options or Block Options to view other levels of edits available.
Editing your plot:
Building-level options
Storefronts
⚠️WARNING: Storefronts are permanent and cannot be removed once applied.
Add a storefront to an existing building. You can’t check the interior of a storefront until after accepting the edits, so avoid these red flags to ensure your store looks its best inside and out:
🚫 Triangular buildings – Can cause layout issues inside.
🚫 Narrow buildings – Might leave you with an unusable, cramped space.
🚫 Corner spots – Could interfere with design and accessibility.
🚫 Hilly/uneven terrain – Can distort your storefront or hide your door.
Stay strategic when stamping to avoid unexpected surprises!
Note: Unlike other stamps, this one has a set order in which the Kiosk types will be selected: Jetpack > Keys > Paperclips > Agent Modules > Remove Utility.
So the first time you stamp you will always get a Jetpack Kiosk; stamp again and it will change to a Key Kiosk. If you change your mind, keep stamping until the utility is removed.
⚠️ WARNING: Once applied, the kiosk cannot be changed to another utility and the option you have chosen is not always clear from Room-Scale. Make sure you review in mini-me mode to check before confirming the edits.
For more details on Kiosks see here And see this guide for information about the Inventory and how to use the items purchased from kiosks.
Utility Kiosks
⚠️WARNING: Kiosks are permanent and cannot be removed once applied.
Add a kiosk to an existing building where users can purchase special items, and receive commission from the sales:
Jetpacks – for a flight through the skies
Paperclips – for spawning AI Agents
Keys – for opening Lootboxes
Modules – for crafting your AI agents
Property Info
Here you can view the apartment listing of any building within Infiniverse and even make an offer or purchase without leaving the map room. You can also upgrade the building to increase the maximum height. However, this information is only available once the building has been fully built (i.e. not a newly-placed building that hasn’t been applied yet).
FAQS
-
Some plots of land are protected and cannot be edited. When viewing the postcode of a plot, if "(Protected)" is displayed, it indicates that existing buildings and landmarks on the plot are safeguarded.
Landmarks - If you purchased a plot that contains a large statue, known as a landmark, you cannot edit/remove it. It has plot protection to ensure it stays unchanged for the benefit of those who have established a community in that location.
Existing Unique Statues - Prior to the release of plot editing, FTL periodically placed unique statues (known as drops) throughout Infiniverse. If you own a plot that contains one of these statues, they cannot be removed or edited.
Apartment Buildings/Skyscrapers/Storefronts - Any type of building that can be purchased or invested into by the community has plot protection. This means that once you place an apartment building, storefronts or Utility Kiosk, you cannot remove it. Please think carefully about your location/positioning of these items before applying your changes. We cannot undo your changes.
-
“Existing developments” means apartment buildings, skyscrapers, storefronts, kiosks, and hubscrapers. If you purchase a plot with any of these already on it, they cannot be removed or changed.
This includes plot themes and layouts. For example, you cannot apply a village skin to a plot that currently has the Empire skin and you cannot change the layout, even if the number of blocks and buildings is the same.
-
If you own a plot and want to keep the specific terrain features or views in the surrounding area, the only way to protect it is by purchasing the other plots too.
We are unable to prevent other users from purchasing adjacent plots and developing them in a manner that may affect your views or area.
-
Hubscrapers are tall buildings with a customisable icon on top. They officially mark your plot as a city, which is then listed as such in the Discovery Menu, increasing your visibility to all users. Your city will also be periodically featured in the Infinihub on one of the large City Doors.
You can only have one hubscraper per plot, and the shape/size of a hubscraper can vary depending on which block you place it in.
To edit your Hubscraper's top and door images, go to the "Plots" tab on multiverseonline.io. There, you can upload an image to the "Hubscraper Branding" slot, as well as populate the Discovery Menu section.
-
Some plot types currently have limited editing options. For example, after you have placed a park or a lake, you cannot then further customise the plot.
However, we are introducing new development options all the time so do check back to see what is available.
-
No. Each time you stamp a plot, block, or building and confirm the edits, you’ll be charged in Metacoins based on the specific stamps used (note: some stamps are free).
Stamps that you have used previously cannot be reused or saved, and must be repurchased each time you stamp them again.
-
All users have access to the same array of editing tools and options for their plots regardless of their metaverse subscription type. However, we occasionally withdraw old options to make space for new ones.
-
Currently, trading, selling, or transferring plots is NOT possible. Please only purchase plots that you intend to own and develop in the future.
-
The plots across Infiniverse are designed using a system known as “Voronoi cells”. For you and me, that just means they look very random in shape. Some are long and thin, others are more rounded. This means that when the plot gets divided into blocks, those blocks may also be very irregular in shape.
The landscape can also vary greatly in terms of hilliness.
Bear in mind therefore that some items may not be as aesthetically pleasing in more hilly or narrow areas. If you find that the layout you've chosen isn't working, try a different option. Keep stamping again until you find the best fit.
-
Being able to shrink to Mini-Mode gives you a much better view of what your plot will look like once built into Infiniverse.
In particular, some border items such as flowers and bushes may not be visible at Room Scale. For a full view of these elements, try shrinking down to Mini-Mode.
In addition, the Kiosk type (e.g. Jetpack, Keys) may not always be visible from room scale, so make sure you check in Mini-Mode to ensure you have selected the correct type, as it cannot be changed once applied.
-
The “footprint” of each building can vary greatly depending on the shape of the block it is in, and the number of buildings it is sharing that block with.
When deciding where to place a storefront, try to avoid very thin or triangular blocks, as these may affect the interior. Even though we have a selection of storefront styles, if you place a storefront on a highly irregular building, we cannot guarantee that the neighbouring sidewalk or walls will not clip through into the interior.
Last updated: 17 April, 2025